No edit summary |
|||
| (23 intermediate revisions by 8 users not shown) | |||
| Line 1: | Line 1: | ||
| + | {{Object-infobox |
||
| − | {{Object_infobox |
||
|name=Mao Kun Map |
|name=Mao Kun Map |
||
| − | |image=[[ |
+ | |image=[[File:AWETheMapbyJimByrkit.jpg|250px]] |
|creator=Four explorers of the Dark Dynasty<ref name="MotLotD">Information shown from the [[:File:MOTLOTD.jpg|Map of the Land of the Dead product info]].</ref> |
|creator=Four explorers of the Dark Dynasty<ref name="MotLotD">Information shown from the [[:File:MOTLOTD.jpg|Map of the Land of the Dead product info]].</ref> |
||
| − | |made=After [[1523]]<ref>"[[Juan Ponce de León|Ponce de León]] [[1523]]" was written on the map, therefore, the map would've been made after Ponce de León's |
+ | |made=After [[1523]]<ref>"[[Juan Ponce de León|Ponce de León]] [[1523]]" was written on the map, therefore, the map would've been made after Ponce de León's search for the [[Fountain of Youth]].</ref> |
| − | |owner=[[Wu Ling]]<br>[[Sao Feng]]<br>[[William Turner Jr.|Will Turner]]<br>[[Hector Barbossa]]<br>[[Jack Sparrow]]<br>[[Joshamee Gibbs]] |
+ | |owner=[[Wu Ling]]<ref name="MotLotD"/><br>[[Sao Feng]]<br>[[William Turner Jr.|Will Turner]]<br>[[Hector Barbossa]]<br>[[Jack Sparrow]]<br>[[Joshamee Gibbs]] |
|affiliation=[[Wu Ling]]<br>[[Sao Feng]]<br>[[Farthest Gate]]<br>[[Davy Jones' Locker]]<br>[[Fountain of Youth]] |
|affiliation=[[Wu Ling]]<br>[[Sao Feng]]<br>[[Farthest Gate]]<br>[[Davy Jones' Locker]]<br>[[Fountain of Youth]] |
||
|first=''[[Pirates of the Caribbean: At World's End|At World's End]]'' |
|first=''[[Pirates of the Caribbean: At World's End|At World's End]]'' |
||
|latest= |
|latest= |
||
|last=''[[Pirates of the Caribbean: On Stranger Tides|On Stranger Tides]]'' |
|last=''[[Pirates of the Caribbean: On Stranger Tides|On Stranger Tides]]'' |
||
| − | |cause=Burned by [[Joshamee Gibbs]] |
+ | |cause=Burned by [[Joshamee Gibbs]]<ref name="OST">''[[Pirates of the Caribbean: On Stranger Tides]]''</ref> |
|}} |
|}} |
||
{{Quote|Nothing here is set. These can't be as accurate as modern charts."<br>"No. But it leads to more places.|[[William Turner Jr.|Will Turner]] and [[Tai Huang]]|Pirates of the Caribbean: At World's End}} |
{{Quote|Nothing here is set. These can't be as accurate as modern charts."<br>"No. But it leads to more places.|[[William Turner Jr.|Will Turner]] and [[Tai Huang]]|Pirates of the Caribbean: At World's End}} |
||
| Line 15: | Line 15: | ||
The '''Mao Kun Map''', sometimes referred as the '''navigational charts''' or the '''Map to the Land of the Dead''', was the map used to locate some of the world's more obscure and mystical places. With no fixed points, this chart was the only guide that took into account the role of chance, [[fate]] and the [[supernatural]] in mortal affairs. |
The '''Mao Kun Map''', sometimes referred as the '''navigational charts''' or the '''Map to the Land of the Dead''', was the map used to locate some of the world's more obscure and mystical places. With no fixed points, this chart was the only guide that took into account the role of chance, [[fate]] and the [[supernatural]] in mortal affairs. |
||
| − | Originally given to the esteemed and great navigator [[Wu Ling]], who was known for going on various journeys to the mysterious gates of the afterlife, this map was prized above all other charts. The map would later be owned by the [[Pirate Lord]] of [[Singapore]], [[Sao Feng]]. After [[William Turner Jr.|Will Turner]] attempted to steal them, Feng would have given the charts to [[Hector Barbossa]] and [[Motley crew|his crew]], who would take the route to the [[Farthest Gate]]. It soon made its way to [[Jack Sparrow]], who used the map in his quest to try and find the [[Fountain of Youth]]. |
+ | Originally given to the esteemed and great navigator [[Wu Ling]], who was known for going on various journeys to the mysterious gates of the [[afterlife]], this map was prized above all other charts. It used meridian arcs, equatorial divisions, geographic landmarks and [[magic]] keys to guide one's [[spirit]]ual passage. The map would later be owned by the [[Pirate Lord]] of [[Singapore]], [[Sao Feng]]. After [[William Turner Jr.|Will Turner]] attempted to steal them, Feng would have given the charts to [[Hector Barbossa]] and [[Motley crew|his crew]], who would take the route to the [[Farthest Gate]]. It soon made its way to [[Jack Sparrow]], who used the map in his quest to try and find the [[Fountain of Youth]]. |
==History== |
==History== |
||
===Early use=== |
===Early use=== |
||
| − | Compiled by the four explorers of the Dark Dynasty, this map was presented to the esteemed and great navigator [[Wu Ling]] for his journeys to the mysterious gates of the afterlife. The map |
+ | Compiled by the four explorers of the Dark Dynasty, this map was presented to the esteemed and great navigator [[Wu Ling]] for his journeys to the mysterious gates of the [[afterlife]]. The map led its holder to spiritual realms and [[legend]]s of the land beyond [[death]], particularly towards the [[Farthest Gate]], [[Davy Jones' Locker]], and the [[Fountain of Youth]]. It used meridian arcs, equatorial divisions, geographic landmarks and magic keys to guide one's spiritual passage.<ref name="MotLotD"/> Death-inspired passages were also included on the map that were translated by the calligrapher. There were rings on the map that were symbolic of lands that can only be accessed through dreams.<ref name="POTCWikiInterview">[[User blog:J Fan/POTC Interview with Jim Byrkit 2012|POTC Interview with Jim Byrkit 2012]]</ref> The map would be passed down from generation to generation. |
===At World's End=== |
===At World's End=== |
||
====Obtaining the charts==== |
====Obtaining the charts==== |
||
{{Quote|I've a venture underway and I find myself in need of a ship and a crew."<br>"Hmm...It's an odd coincidence."<br>"Because you happen to have a ship and a crew you don't need?"<br>"No. Because earlier this day, not far from here, a thief broke into [[Sao Feng's uncle|my most revered uncle]]'s temple and tried to make off with these. The navigational charts. The route to the [[Farthest Gate]]. Wouldn't it be amazing if this venture of yours took you to the world beyond this one?|[[Hector Barbossa]], [[Sao Feng]] and [[Elizabeth Swann]]|Pirates of the Caribbean: At World's End}} |
{{Quote|I've a venture underway and I find myself in need of a ship and a crew."<br>"Hmm...It's an odd coincidence."<br>"Because you happen to have a ship and a crew you don't need?"<br>"No. Because earlier this day, not far from here, a thief broke into [[Sao Feng's uncle|my most revered uncle]]'s temple and tried to make off with these. The navigational charts. The route to the [[Farthest Gate]]. Wouldn't it be amazing if this venture of yours took you to the world beyond this one?|[[Hector Barbossa]], [[Sao Feng]] and [[Elizabeth Swann]]|Pirates of the Caribbean: At World's End}} |
||
| − | |||
The map was later stored in the temple of [[Sao Feng]]'s wizened uncle, as Feng did not want the salty air of his waterfront lair to damage the chart's delicate pigmentation. He was also known to carry it on his back when using them for navigation. The chart was moved to Feng's bath house after [[William Turner Jr.|Will Turner]] tried to steal it for [[Hector Barbossa]]. During the [[Battle of Singapore]], Will made a deal with Feng that procured Barbossa's crew the chart, leading them to [[Farthest Gate|World's End]] and [[Davy Jones' Locker]] beyond.<ref name="AWE">''[[Pirates of the Caribbean: At World's End]]''</ref> |
The map was later stored in the temple of [[Sao Feng]]'s wizened uncle, as Feng did not want the salty air of his waterfront lair to damage the chart's delicate pigmentation. He was also known to carry it on his back when using them for navigation. The chart was moved to Feng's bath house after [[William Turner Jr.|Will Turner]] tried to steal it for [[Hector Barbossa]]. During the [[Battle of Singapore]], Will made a deal with Feng that procured Barbossa's crew the chart, leading them to [[Farthest Gate|World's End]] and [[Davy Jones' Locker]] beyond.<ref name="AWE">''[[Pirates of the Caribbean: At World's End]]''</ref> |
||
| Line 30: | Line 29: | ||
{{Quote| 'Over the edge. Over again'. 'Sunrise sets. Flash of green'...Do you care to interpret, Captain Barbossa?|[[William Turner Jr.|Will Turner]] to [[Hector Barbossa]]|Pirates of the Caribbean: At World's End}} |
{{Quote| 'Over the edge. Over again'. 'Sunrise sets. Flash of green'...Do you care to interpret, Captain Barbossa?|[[William Turner Jr.|Will Turner]] to [[Hector Barbossa]]|Pirates of the Caribbean: At World's End}} |
||
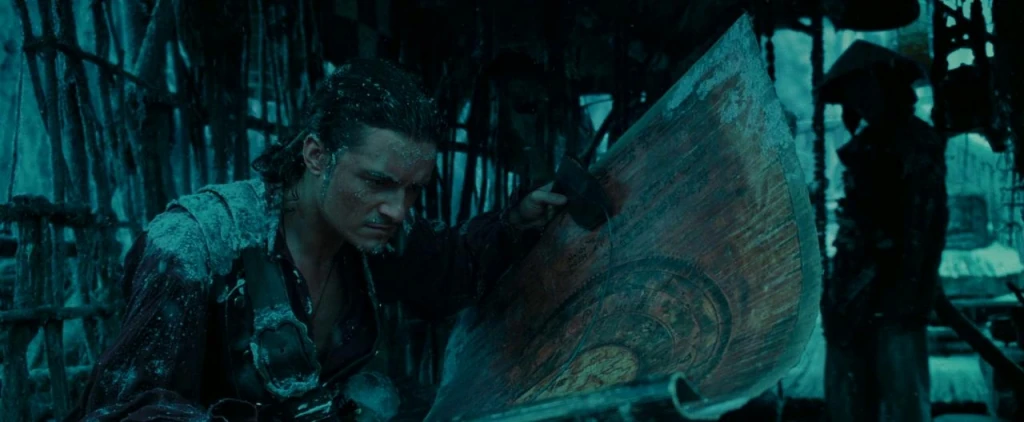
[[Image:Will and Tai Huang Charts AWE.jpg|thumb|left|325px|[[William Turner Jr.|Will Turner]] examining the charts in the ''[[Hai Peng]]''.]] |
[[Image:Will and Tai Huang Charts AWE.jpg|thumb|left|325px|[[William Turner Jr.|Will Turner]] examining the charts in the ''[[Hai Peng]]''.]] |
||
| ⚫ | After escaping Singapore with the ''[[Hai Peng]]'', along with the map, they've made their journey to World's End. The crew used the navigational charts throughout their journey to [[Farthest Gate|World's End]]. As they were getting closer, they sailed through waters that reflected the stars so perfectly that it was nearly impossible to find the horizon. They soon realized that in order to go to Davy Jones' Locker, they had to go over a massive waterfall. Upon reaching it, the ship was cast down the waterfall and destroyed.<ref name="AWE"/> |
||
| − | |||
| ⚫ | After escaping Singapore with the [[Hai Peng]], along with the map, they've made their journey to World's End. The crew used the navigational charts throughout their journey to [[Farthest Gate|World's End]]. As they were getting closer, they sailed through waters that reflected the stars so perfectly that it was nearly impossible to find the horizon. They soon realized that in order to go to Davy Jones' Locker, they had to go over a massive waterfall. Upon reaching |
||
====Escaping the Locker==== |
====Escaping the Locker==== |
||
| − | {{Quote| |
+ | {{Quote|'Up is down'...well that's just maddeningly unhelpful. Why are these things never clear?|[[Jack Sparrow]] on the navigational chart|Pirates of the Caribbean: At World's End}} |
[[Image:AWEUpisDown.jpg|thumb|right|325px|"Up is Down" as seen in the charts.]] |
[[Image:AWEUpisDown.jpg|thumb|right|325px|"Up is Down" as seen in the charts.]] |
||
| − | |||
Barbossa still had the charts when they arrived in the Locker and joined [[Jack Sparrow]] on the ''[[Black Pearl]]''. After which, they have tried to figure out a way to return to the land of the living. Sparrow later deciphered the chart's cryptic message, "Up is Down" on how to escape from the Locker and return to the land of the living: to flip the ship over by sundown. So Sparrow, along with the rest of the crew, flipped the ''Pearl'' over. When the sun sets, the green flash shoots up to the sky and transports the ''Black Pearl'', along with its crewman, to the land of the living.<ref name="AWE"/> |
Barbossa still had the charts when they arrived in the Locker and joined [[Jack Sparrow]] on the ''[[Black Pearl]]''. After which, they have tried to figure out a way to return to the land of the living. Sparrow later deciphered the chart's cryptic message, "Up is Down" on how to escape from the Locker and return to the land of the living: to flip the ship over by sundown. So Sparrow, along with the rest of the crew, flipped the ''Pearl'' over. When the sun sets, the green flash shoots up to the sky and transports the ''Black Pearl'', along with its crewman, to the land of the living.<ref name="AWE"/> |
||
| Line 43: | Line 40: | ||
{{Quote|It would make us feel a whole lot better, regarding our fortunes, if we could see [[Fountain of Youth|that 'item']] you told us about."<br>"On the charts.|[[Pintel]] and [[Marty]] to [[Hector Barbossa]]|Pirates of the Caribbean: At World's End}} |
{{Quote|It would make us feel a whole lot better, regarding our fortunes, if we could see [[Fountain of Youth|that 'item']] you told us about."<br>"On the charts.|[[Pintel]] and [[Marty]] to [[Hector Barbossa]]|Pirates of the Caribbean: At World's End}} |
||
[[Image:Jack Turning Charts AWE.jpg|thumb|left|300px|[[Jack Sparrow]] looking through the charts.]] |
[[Image:Jack Turning Charts AWE.jpg|thumb|left|300px|[[Jack Sparrow]] looking through the charts.]] |
||
| − | |||
Following the death of [[Lord]] [[Cutler Beckett]], Barbossa stole the ''Pearl'' from Jack once again, with the charts in his possession. Jack anticipated this treachery, so he stole the middle part of Sao Feng's charts from Barbossa and began his quest to find the [[Fountain of Youth]]. Barbossa also planned on finding it, but it was postponed because of the loss of the part of the charts. Taking the route of [[Juan Ponce de León]] on the charts, Jack sailed on [[Jack Sparrow's dinghy|a small vessel]] to begin his search for the Fountain.<ref name="AWE"/> |
Following the death of [[Lord]] [[Cutler Beckett]], Barbossa stole the ''Pearl'' from Jack once again, with the charts in his possession. Jack anticipated this treachery, so he stole the middle part of Sao Feng's charts from Barbossa and began his quest to find the [[Fountain of Youth]]. Barbossa also planned on finding it, but it was postponed because of the loss of the part of the charts. Taking the route of [[Juan Ponce de León]] on the charts, Jack sailed on [[Jack Sparrow's dinghy|a small vessel]] to begin his search for the Fountain.<ref name="AWE"/> |
||
====Stolen and destruction==== |
====Stolen and destruction==== |
||
{{Quote|We know you're in possession of a map."<br>"So confiscate the map, and to the gallows with him!"<br>"Have you a map?"<br>"...No.|[[Henry Pelham]], [[John Carteret]], [[George II of Great Britain|King George]], and [[Jack Sparrow]]|Pirates of the Caribbean: On Stranger Tides}} |
{{Quote|We know you're in possession of a map."<br>"So confiscate the map, and to the gallows with him!"<br>"Have you a map?"<br>"...No.|[[Henry Pelham]], [[John Carteret]], [[George II of Great Britain|King George]], and [[Jack Sparrow]]|Pirates of the Caribbean: On Stranger Tides}} |
||
| ⚫ | Some years later, Jack met with [[Joshamee Gibbs]] after a trial against Gibbs. Noticing the map on Jack's person, Gibbs asked of Jack's quest to the [[Fountain of Youth]]. Taking the map back, Jack said that it was delayed but vowed to taste the waters. Shortly before Jack and Gibbs were captured by the [[Royal Guard]]s at [[St. James's Palace]], unbeknown to Jack, Gibbs stole the charts. After being thrown in prison, Gibbs would spend his time studying the map well enough to memorize every route and destination.<ref name="OST"/> |
||
| − | |||
| ⚫ | Some years later, Jack met with [[Joshamee Gibbs]] after a trial against Gibbs. Noticing the map on Jack's person, Gibbs asked of Jack's quest to the [[Fountain of Youth]]. Taking the map back, Jack said that it was delayed but vowed to taste the waters. Shortly before Jack and Gibbs were captured by the [[Royal Guard]]s at [[St. James's Palace]], unbeknown to Jack, Gibbs stole the charts. After being thrown in prison, Gibbs would spend his time studying the map well enough to memorize every route and destination.<ref name="OST" |
||
[[File:OSTMapBurned1.jpg|thumb|325px|The Mao Kun Map being burned.]] |
[[File:OSTMapBurned1.jpg|thumb|325px|The Mao Kun Map being burned.]] |
||
| − | Threatened into being hung by the gallows at the [[Tower of London]], Gibbs revealed of having possession of the map to [[Hector Barbossa]], now [[privateer]] for [[King]] [[George II of Great Britain|George II]]. Barbossa tried to convince Gibbs to give him the map, but Gibbs burned it |
+ | Threatened into being hung by the gallows at the [[Tower of London]], Gibbs revealed of having possession of the map to [[Hector Barbossa]], now [[privateer]] for [[King]] [[George II of Great Britain|George II]]. Barbossa tried to convince Gibbs to give him the map, but Gibbs burned it. Despite this, Gibbs revealed he had enough time to study the map, and now had every route and destination memorized. With the knowledge that Gibbs was the only one who could help him find the Fountain, Barbossa recruited Gibbs into the [[British Royal Navy|His Majesty's Navy]].<ref name="OST"/> It is unknown how much of the map Gibbs was able to memorize, aside from the route to the Fountain of Youth. |
| + | |||
| − | {{Quote|You fool!"<br>"I |
+ | {{Quote|You fool!"<br>"I had just enough time to study those infernal circles. Every route. Every destination. All safe...in here.|[[Hector Barbossa]] and [[Joshamee Gibbs]] after Gibbs burned the map|Pirates of the Caribbean: On Stranger Tides (junior novelization)}} |
==Appearance and design== |
==Appearance and design== |
||
| − | [[File:Nav chart full.jpg|left|thumb| |
+ | [[File:Nav chart full.jpg|left|thumb|200px|Concept art from ''[[Pirates of the Caribbean: At World's End|At World's End]]''.]] |
| + | |||
{{Quote|I would do anything to bring [[Jack Sparrow|him]] back."<br>"Aye lass, but you won't be doin' it without some help now. All you need is a guide, which you now possess, and a map."<br>"And where does one find a map to Davy Jones' Locker?"<br>"Singapore!|[[Elizabeth Swann]] and [[Hector Barbossa]]|Pirates of the Caribbean: At World's End (video game)}} |
{{Quote|I would do anything to bring [[Jack Sparrow|him]] back."<br>"Aye lass, but you won't be doin' it without some help now. All you need is a guide, which you now possess, and a map."<br>"And where does one find a map to Davy Jones' Locker?"<br>"Singapore!|[[Elizabeth Swann]] and [[Hector Barbossa]]|Pirates of the Caribbean: At World's End (video game)}} |
||
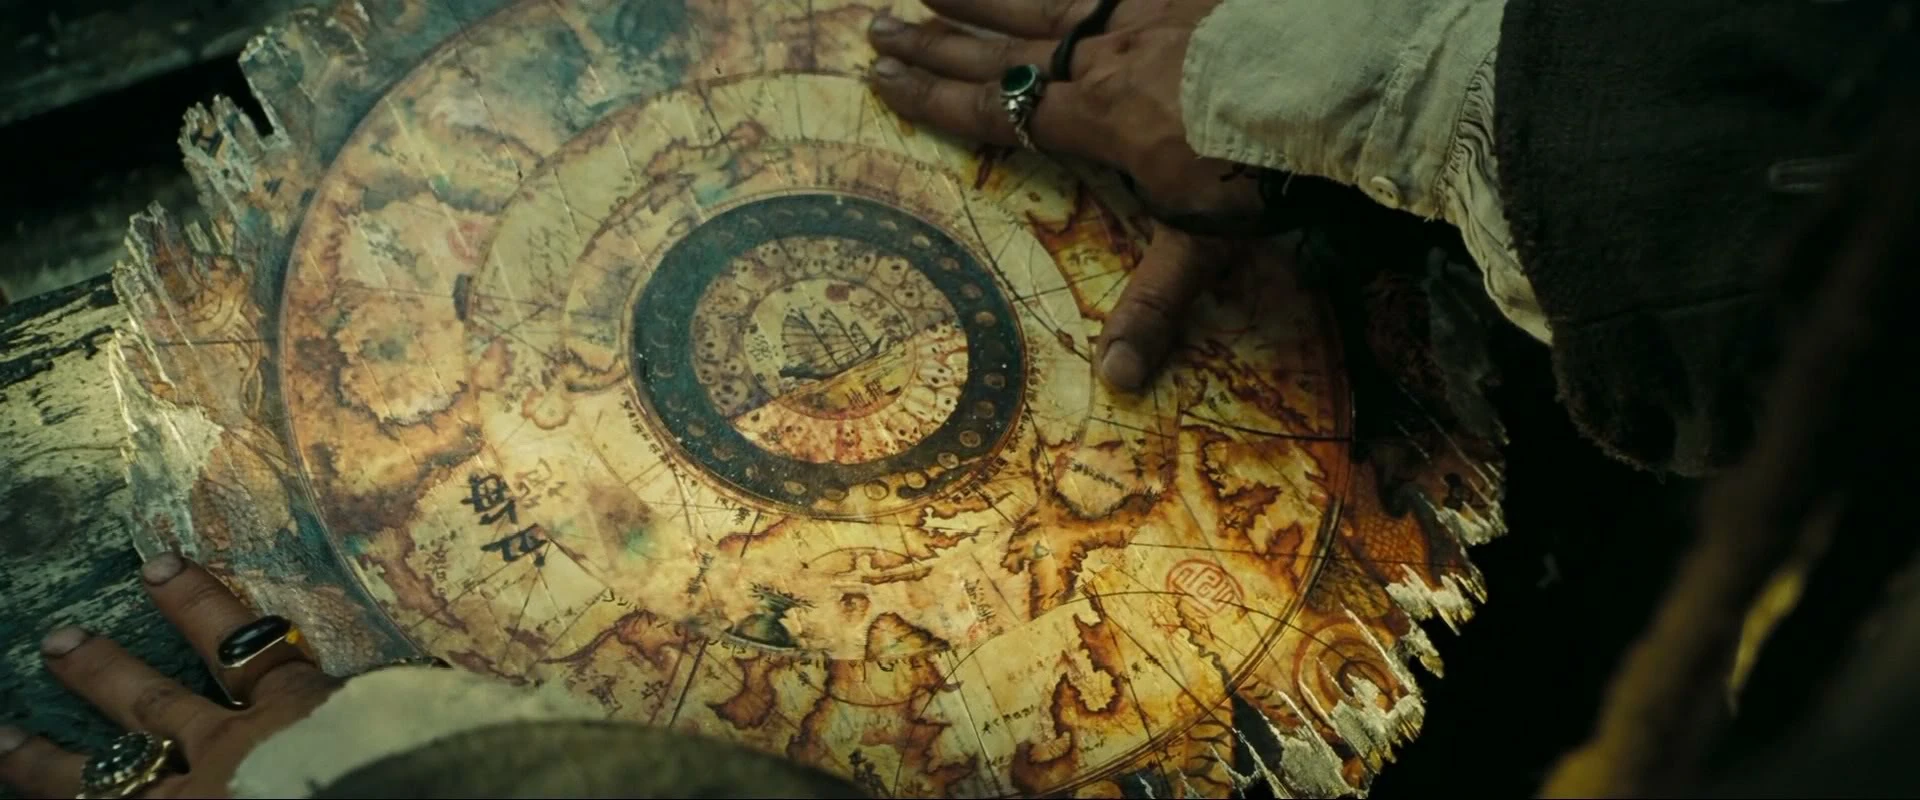
| ⚫ | The Mao Kun Map was believed to have been painted on ''washi''-handmade Japanese rice paper<ref name="AWE notes">[http://numberonestars.com/pirates3/production15.htm ''At World's End'' production notes: Chapter 15 - Props: Weapons, Maps, Rings or Whatever]</ref>. These navigational charts were comprised of several rings upon which a map of the world was etched. By rotating the rings and lining one up with another, a reader could use the chart to find any number of mystical locations. The map also had a fairly accurate piece of [[Florida]] and [[Mexico]]. Some rings were symbolic of lands that can only be accessed through dreams.<ref name="POTCWikiInterview"/> |
||
| ⚫ | Some [[death]]-inspired passages were included on the map that were translated by the calligrapher.<ref name="POTCWikiInterview"/> The Chinese symbols on the map could be deciphered to reveal such locations as "Ghosts of Lost Souls at Sea to be Shepherded Through the Watery Passageway," "Forgotten Sailors Sleep with Eyes Open Dreaming of a Salt Water Death" and "The Rich Man Finds No More Hope of Continued Life-Death Will Always Be A Stairway Behind".<ref name="AWE notes" /> Images of dragons—harbingers of good fortune in war—and tigers—devourers of evil spirits—could be found on the chart. The central ring depicted is an intrepid [[junk]], surrounded by [[skull]]s, which is surrounded by the phases of the [[moon]].<ref name="CompleteVisual">''[[Pirates of the Caribbean: The Complete Visual Guide]]'' p86-87 "Sao Feng's Map"</ref> |
||
| ⚫ | The Mao Kun Map was believed to have been painted on ''washi''-handmade Japanese rice paper<ref name="AWE notes">[http://numberonestars.com/pirates3/production15.htm ''At World's End'' production notes: Chapter 15 - Props: Weapons, Maps, Rings or Whatever]</ref>. These navigational charts were comprised of several rings upon which a map of the world was etched. By rotating the rings and lining one up with another, a reader could use the chart to find any number of mystical locations. |
||
| ⚫ | |||
| ⚫ | The Chinese symbols on the map could be deciphered to reveal such locations as "Ghosts of Lost Souls at Sea to be Shepherded Through the Watery Passageway," "Forgotten Sailors Sleep with Eyes Open Dreaming of a Salt Water Death" and "The Rich Man Finds No More Hope of Continued Life-Death Will Always Be A Stairway Behind".<ref name="AWE notes" /> Images of dragons—harbingers of good fortune in war—and tigers—devourers of evil spirits—could be found on the chart. The central ring depicted is an intrepid [[junk]], surrounded by |
||
| ⚫ | |||
{{Quote|Son, the [[Fountain of Youth|Fountain]]. There be items required, for the [[Profane Ritual]]. [[Chalices of Cartagena|Two Chalices]]."<br>"On the map, there was a Chalice—|[[Edward Teague]] and [[Jack Sparrow]]|Pirates of the Caribbean: On Stranger Tides}} |
{{Quote|Son, the [[Fountain of Youth|Fountain]]. There be items required, for the [[Profane Ritual]]. [[Chalices of Cartagena|Two Chalices]]."<br>"On the map, there was a Chalice—|[[Edward Teague]] and [[Jack Sparrow]]|Pirates of the Caribbean: On Stranger Tides}} |
||
| − | |||
If lined up correctly, the map to the [[Fountain of Youth]] would be found, having the route through [[Whitecap Bay]] as well as a [[Unnamed island|jungle-dense island]] which leads to the Fountain. The struggle for eternal life is symbolized by a tug of war between a [[skeleton]] and an [[angel]], which is aligned with the the symbol of the Fountain itself: the [[Chalices of Cartagena|Chalices]].<ref name="OSTVisual">''[[Pirates of the Caribbean: On Stranger Tides: The Visual Guide]]'', p26-27: "Mao Kun Map"</ref> |
If lined up correctly, the map to the [[Fountain of Youth]] would be found, having the route through [[Whitecap Bay]] as well as a [[Unnamed island|jungle-dense island]] which leads to the Fountain. The struggle for eternal life is symbolized by a tug of war between a [[skeleton]] and an [[angel]], which is aligned with the the symbol of the Fountain itself: the [[Chalices of Cartagena|Chalices]].<ref name="OSTVisual">''[[Pirates of the Caribbean: On Stranger Tides: The Visual Guide]]'', p26-27: "Mao Kun Map"</ref> |
||
| Line 70: | Line 66: | ||
==Behind the scenes== |
==Behind the scenes== |
||
| − | *The Mao Kun Map was created by conceptual consultant [[James Ward Byrkit]] for ''[[Pirates of the Caribbean: At World's End|At World's End]]'' |
+ | *The Mao Kun Map was created by conceptual consultant [[James Ward Byrkit]] for ''[[Pirates of the Caribbean: At World's End|At World's End]]''. Bykrit also worked (uncredited) on making additions to the map for ''[[Pirates of the Caribbean: On Stranger Tides|On Stranger Tides]]''. |
*The name "Mao Kun Map" came from ''[[Pirates of the Caribbean: On Stranger Tides: The Visual Guide|On Stranger Tides: The Visual Guide]]''.<ref name="OSTVisual"/> |
*The name "Mao Kun Map" came from ''[[Pirates of the Caribbean: On Stranger Tides: The Visual Guide|On Stranger Tides: The Visual Guide]]''.<ref name="OSTVisual"/> |
||
*In real-world history, the Mao Kun Map was a series of maps published in the late-[[Wikipedia:Ming Dynasty|Ming Dynasty]] military encyclopedia, ''[[Wikipedia:Wubei Zhi|WuBei Zhi]]''. Believed to be based on the travels of [[Wikipedia:Zheng He|Zheng He]], they showed sailing directions between ports of Southeast [[Asia]] and the northern [[Indian Ocean]], as far as [[Wikipedia:Malindi|Malindi]].<ref>http://commons.wikimedia.org/wiki/Category:Mao_Kun_map</ref> |
*In real-world history, the Mao Kun Map was a series of maps published in the late-[[Wikipedia:Ming Dynasty|Ming Dynasty]] military encyclopedia, ''[[Wikipedia:Wubei Zhi|WuBei Zhi]]''. Believed to be based on the travels of [[Wikipedia:Zheng He|Zheng He]], they showed sailing directions between ports of Southeast [[Asia]] and the northern [[Indian Ocean]], as far as [[Wikipedia:Malindi|Malindi]].<ref>http://commons.wikimedia.org/wiki/Category:Mao_Kun_map</ref> |
||
[[File:OSTFlorida and islandMap.jpg|thumb|right|300px|The notable changes on the map.]] |
[[File:OSTFlorida and islandMap.jpg|thumb|right|300px|The notable changes on the map.]] |
||
| − | *Several |
+ | *Several [[myth]]ological creatures were included on the chart, as well as a [[Hidden Mickey]] (lower right quarter) which looks similar to an early version of [[w:c:disney:Mickey Mouse|Mickey Mouse]], and images of [[Elizabeth Swann]] and [[Jack Sparrow]] (lower left quarter).<ref name="AWE notes" /> |
| + | *In the revision screenplay draft of ''At World's End'', when [[Hector Barbossa]] found that the Mao Kun Map was cut by Jack Sparrow, he was not going to say "Sparrow..." like in the finished version of the film.<ref>[http://thescriptsavant.com/pdf/Pirates_Of_The_Caribbean_At_Worlds_End.pdf Worldplay: ''Calypso's Fury'' draft of ''Pirates of the Caribbean: At World's End'' script]</ref> |
||
| − | *There were three versions of the map. The first was seen several times in '' |
+ | *There were at least three versions of the map. The first was seen several times in ''At World's End'', the second wasn't seen until the last scene of ''At World's End'' (which had [[Florida]], [[Cuba]] and the symbol of the [[Fountain of Youth]] added on it), and the third from ''On Stranger Tides'' (which was the second version but with [[Unnamed island|an island]] added on it).<ref name="POTCWikiInterview"/> |
| + | *The map's paintings were used for the design of building that held ''[[The Legend of Captain Jack Sparrow]]'' attraction, particularly the Fountain of Youth portion of the map. |
||
| + | |||
{{Gallery|Mao Kun Map/Gallery}} |
{{Gallery|Mao Kun Map/Gallery}} |
||
| Line 81: | Line 80: | ||
*''[[Pirates of the Caribbean: At World's End]]'' {{1stID|the navigational charts}} |
*''[[Pirates of the Caribbean: At World's End]]'' {{1stID|the navigational charts}} |
||
**[[Pirates of the Caribbean: At World's End (video game)|''Pirates of the Caribbean: At World's End'' (video game)]] {{1st}} |
**[[Pirates of the Caribbean: At World's End (video game)|''Pirates of the Caribbean: At World's End'' (video game)]] {{1st}} |
||
| + | **[[Pirates of the Caribbean: At World's End (comic)|''Pirates of the Caribbean: At World's End'' (comic)]] |
||
*''[[Pirates of the Caribbean: On Stranger Tides]]'' |
*''[[Pirates of the Caribbean: On Stranger Tides]]'' |
||
*''[[LEGO Pirates of the Caribbean: The Video Game]]'' {{Nc}} |
*''[[LEGO Pirates of the Caribbean: The Video Game]]'' {{Nc}} |
||
| + | *''[[Kingdom Hearts III]]'' {{Nc}} |
||
==Sources== |
==Sources== |
||
*''[[Pirates of the Caribbean: The Complete Visual Guide]]'' |
*''[[Pirates of the Caribbean: The Complete Visual Guide]]'' |
||
*''[[Pirates of the Caribbean: On Stranger Tides: The Visual Guide]]'' {{1stID|the Mao Kun Map}} |
*''[[Pirates of the Caribbean: On Stranger Tides: The Visual Guide]]'' {{1stID|the Mao Kun Map}} |
||
| + | |||
| + | ==External links== |
||
| + | *{{WP|Mao Kun map}} |
||
==Notes and references== |
==Notes and references== |
||
| − | {{Reflist |
+ | {{Reflist}} |
| + | |||
| + | [[de:Mao Kun Karte]] |
||
| + | [[it:Mappa di Mao Kun]] |
||
[[Category:Maps]] |
[[Category:Maps]] |
||
[[Category:Lore]] |
[[Category:Lore]] |
||
Revision as of 11:16, 30 June 2019
Template:Object-infobox
- "Nothing here is set. These can't be as accurate as modern charts."
"No. But it leads to more places." - ―Will Turner and Tai Huang
The Mao Kun Map, sometimes referred as the navigational charts or the Map to the Land of the Dead, was the map used to locate some of the world's more obscure and mystical places. With no fixed points, this chart was the only guide that took into account the role of chance, fate and the supernatural in mortal affairs.
Originally given to the esteemed and great navigator Wu Ling, who was known for going on various journeys to the mysterious gates of the afterlife, this map was prized above all other charts. It used meridian arcs, equatorial divisions, geographic landmarks and magic keys to guide one's spiritual passage. The map would later be owned by the Pirate Lord of Singapore, Sao Feng. After Will Turner attempted to steal them, Feng would have given the charts to Hector Barbossa and his crew, who would take the route to the Farthest Gate. It soon made its way to Jack Sparrow, who used the map in his quest to try and find the Fountain of Youth.
History
Early use
Compiled by the four explorers of the Dark Dynasty, this map was presented to the esteemed and great navigator Wu Ling for his journeys to the mysterious gates of the afterlife. The map led its holder to spiritual realms and legends of the land beyond death, particularly towards the Farthest Gate, Davy Jones' Locker, and the Fountain of Youth. It used meridian arcs, equatorial divisions, geographic landmarks and magic keys to guide one's spiritual passage.[1] Death-inspired passages were also included on the map that were translated by the calligrapher. There were rings on the map that were symbolic of lands that can only be accessed through dreams.[2] The map would be passed down from generation to generation.
At World's End
Obtaining the charts
- "I've a venture underway and I find myself in need of a ship and a crew."
"Hmm...It's an odd coincidence."
"Because you happen to have a ship and a crew you don't need?"
"No. Because earlier this day, not far from here, a thief broke into my most revered uncle's temple and tried to make off with these. The navigational charts. The route to the Farthest Gate. Wouldn't it be amazing if this venture of yours took you to the world beyond this one?" - ―Hector Barbossa, Sao Feng and Elizabeth Swann
The map was later stored in the temple of Sao Feng's wizened uncle, as Feng did not want the salty air of his waterfront lair to damage the chart's delicate pigmentation. He was also known to carry it on his back when using them for navigation. The chart was moved to Feng's bath house after Will Turner tried to steal it for Hector Barbossa. During the Battle of Singapore, Will made a deal with Feng that procured Barbossa's crew the chart, leading them to World's End and Davy Jones' Locker beyond.[3]
Journey to Davy Jones' Locker
- " 'Over the edge. Over again'. 'Sunrise sets. Flash of green'...Do you care to interpret, Captain Barbossa?"
- ―Will Turner to Hector Barbossa
Will Turner examining the charts in the Hai Peng.
After escaping Singapore with the Hai Peng, along with the map, they've made their journey to World's End. The crew used the navigational charts throughout their journey to World's End. As they were getting closer, they sailed through waters that reflected the stars so perfectly that it was nearly impossible to find the horizon. They soon realized that in order to go to Davy Jones' Locker, they had to go over a massive waterfall. Upon reaching it, the ship was cast down the waterfall and destroyed.[3]
Escaping the Locker
- "'Up is down'...well that's just maddeningly unhelpful. Why are these things never clear?"
- ―Jack Sparrow on the navigational chart
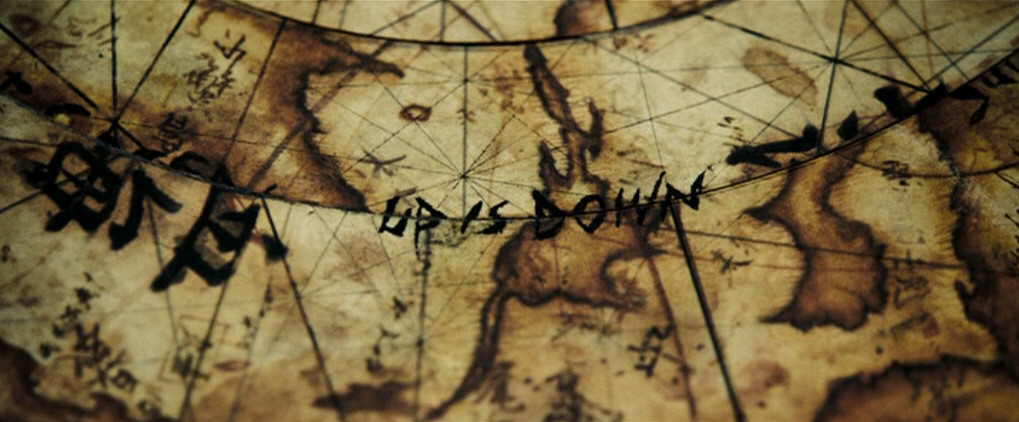
"Up is Down" as seen in the charts.
Barbossa still had the charts when they arrived in the Locker and joined Jack Sparrow on the Black Pearl. After which, they have tried to figure out a way to return to the land of the living. Sparrow later deciphered the chart's cryptic message, "Up is Down" on how to escape from the Locker and return to the land of the living: to flip the ship over by sundown. So Sparrow, along with the rest of the crew, flipped the Pearl over. When the sun sets, the green flash shoots up to the sky and transports the Black Pearl, along with its crewman, to the land of the living.[3]
The Fountain of Youth
Beginning the search
- "It would make us feel a whole lot better, regarding our fortunes, if we could see that 'item' you told us about."
"On the charts." - ―Pintel and Marty to Hector Barbossa
Jack Sparrow looking through the charts.
Following the death of Lord Cutler Beckett, Barbossa stole the Pearl from Jack once again, with the charts in his possession. Jack anticipated this treachery, so he stole the middle part of Sao Feng's charts from Barbossa and began his quest to find the Fountain of Youth. Barbossa also planned on finding it, but it was postponed because of the loss of the part of the charts. Taking the route of Juan Ponce de León on the charts, Jack sailed on a small vessel to begin his search for the Fountain.[3]
Stolen and destruction
- "We know you're in possession of a map."
"So confiscate the map, and to the gallows with him!"
"Have you a map?"
"...No." - ―Henry Pelham, John Carteret, King George, and Jack Sparrow
Some years later, Jack met with Joshamee Gibbs after a trial against Gibbs. Noticing the map on Jack's person, Gibbs asked of Jack's quest to the Fountain of Youth. Taking the map back, Jack said that it was delayed but vowed to taste the waters. Shortly before Jack and Gibbs were captured by the Royal Guards at St. James's Palace, unbeknown to Jack, Gibbs stole the charts. After being thrown in prison, Gibbs would spend his time studying the map well enough to memorize every route and destination.[4]

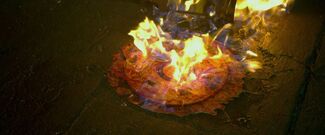
The Mao Kun Map being burned.
Threatened into being hung by the gallows at the Tower of London, Gibbs revealed of having possession of the map to Hector Barbossa, now privateer for King George II. Barbossa tried to convince Gibbs to give him the map, but Gibbs burned it. Despite this, Gibbs revealed he had enough time to study the map, and now had every route and destination memorized. With the knowledge that Gibbs was the only one who could help him find the Fountain, Barbossa recruited Gibbs into the His Majesty's Navy.[4] It is unknown how much of the map Gibbs was able to memorize, aside from the route to the Fountain of Youth.
- "You fool!"
"I had just enough time to study those infernal circles. Every route. Every destination. All safe...in here." - ―Hector Barbossa and Joshamee Gibbs after Gibbs burned the map
Appearance and design

Concept art from At World's End.
- "I would do anything to bring him back."
"Aye lass, but you won't be doin' it without some help now. All you need is a guide, which you now possess, and a map."
"And where does one find a map to Davy Jones' Locker?"
"Singapore!" - ―Elizabeth Swann and Hector Barbossa
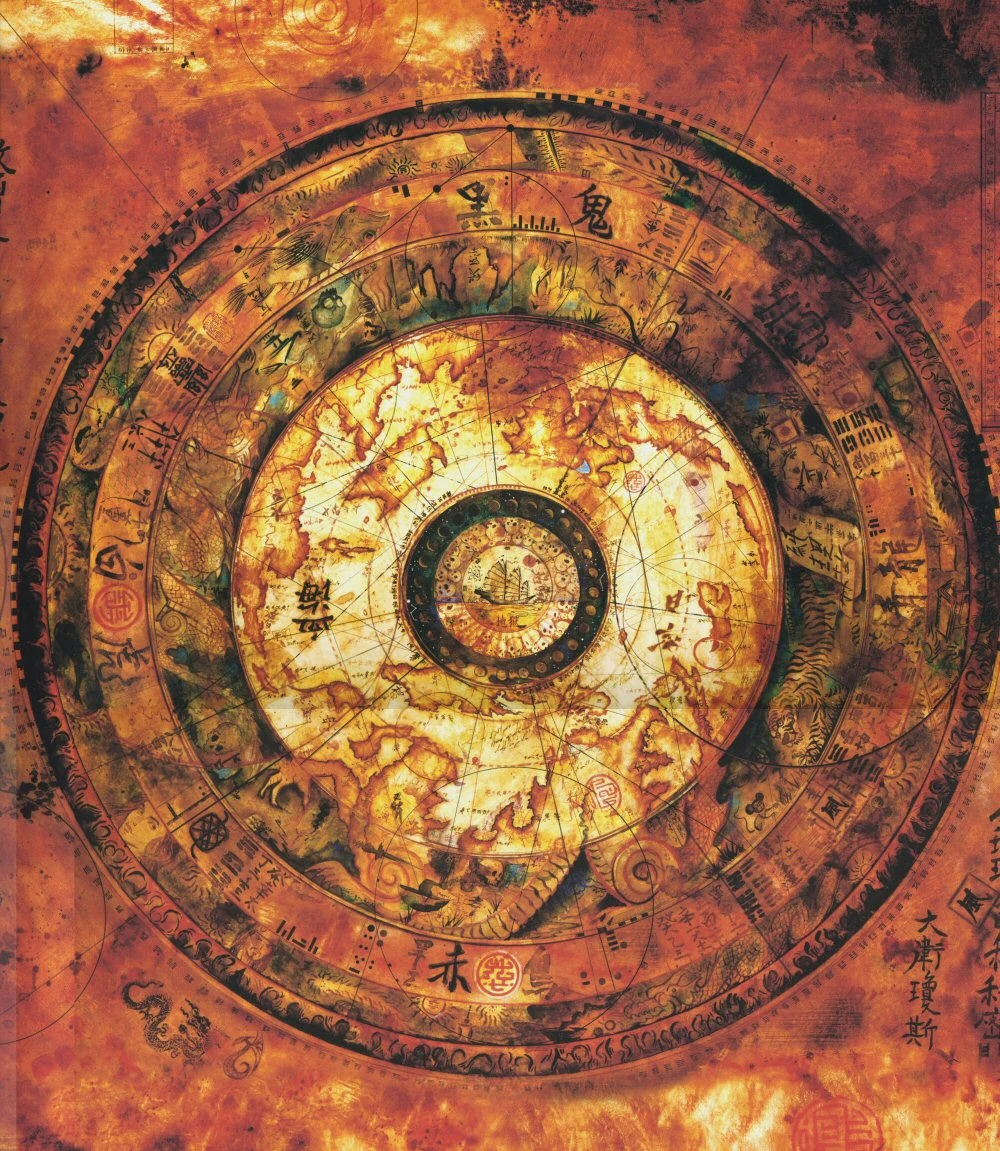
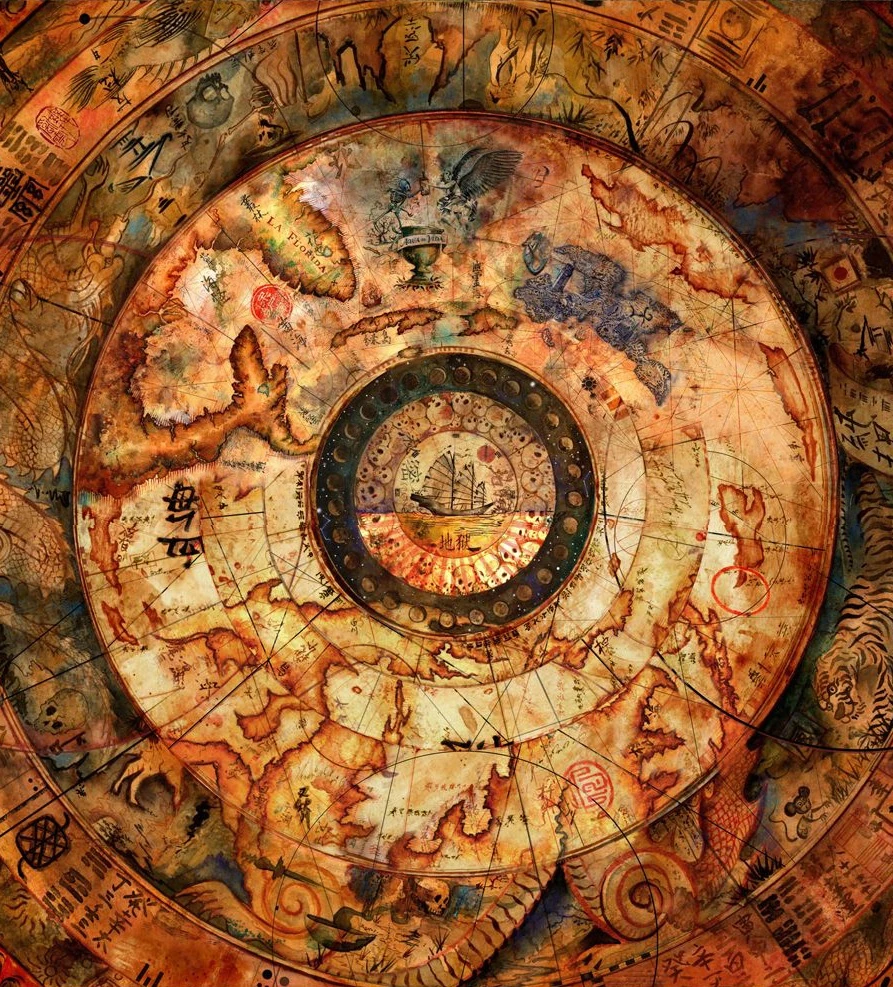
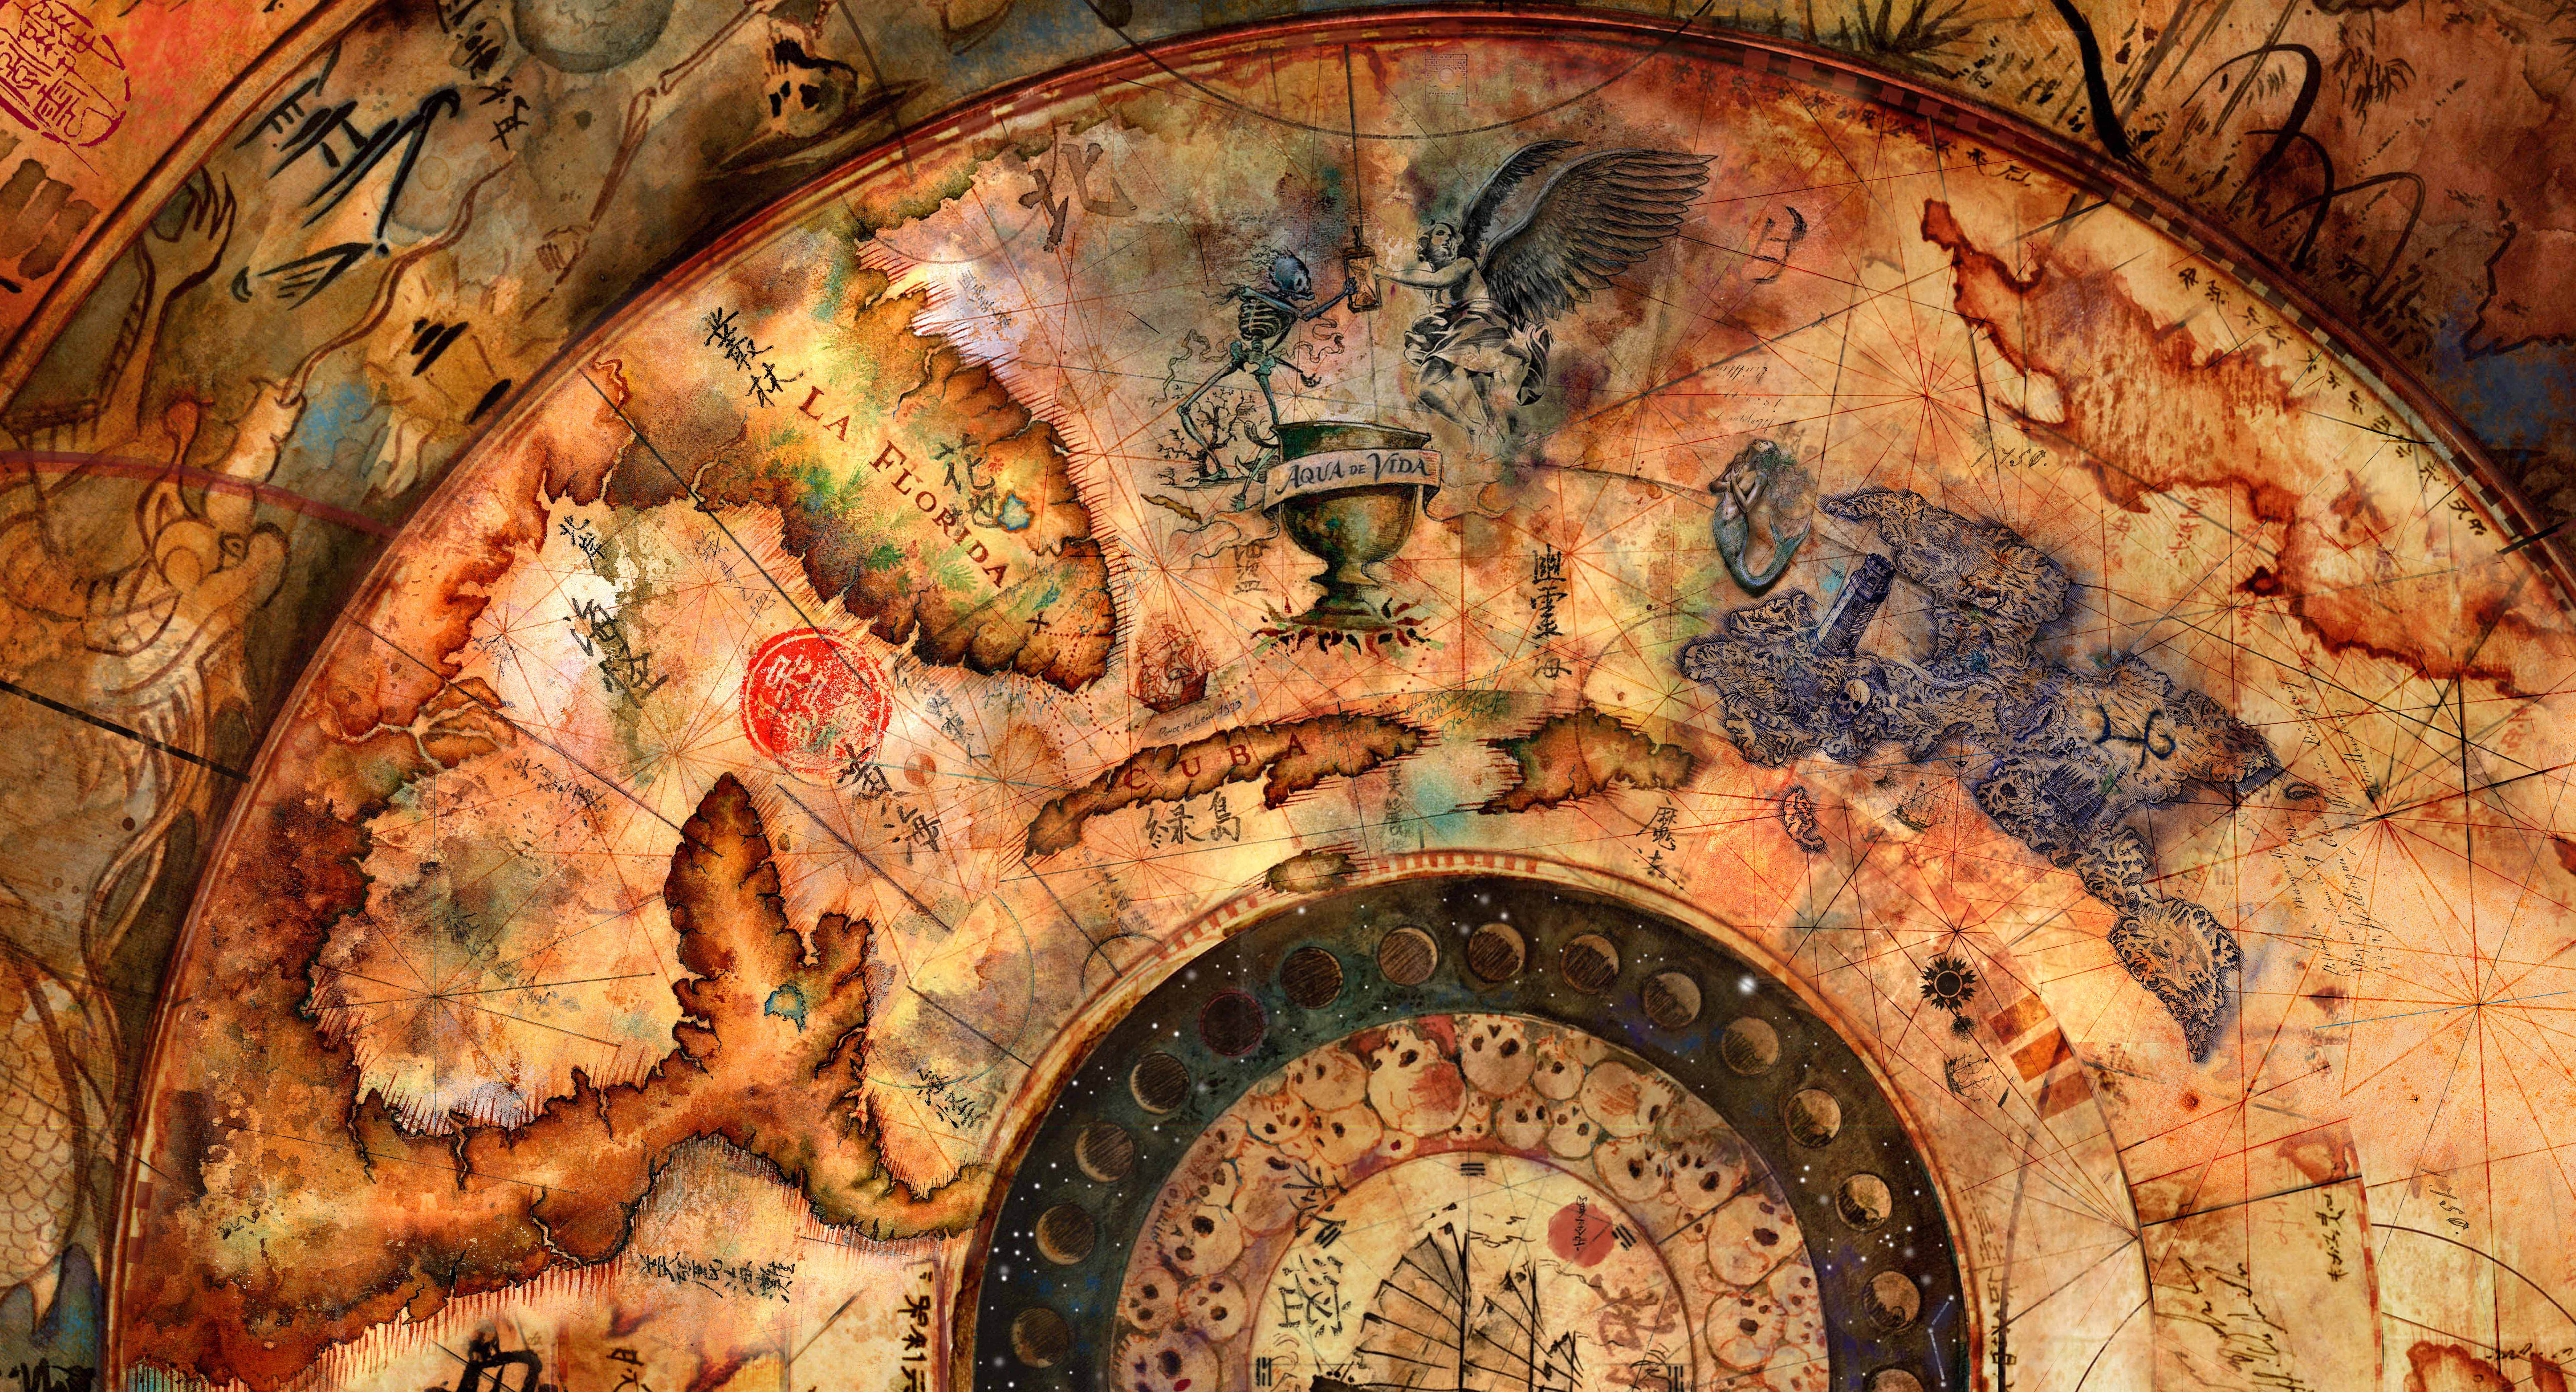
The Mao Kun Map was believed to have been painted on washi-handmade Japanese rice paper[5]. These navigational charts were comprised of several rings upon which a map of the world was etched. By rotating the rings and lining one up with another, a reader could use the chart to find any number of mystical locations. The map also had a fairly accurate piece of Florida and Mexico. Some rings were symbolic of lands that can only be accessed through dreams.[2]
Some death-inspired passages were included on the map that were translated by the calligrapher.[2] The Chinese symbols on the map could be deciphered to reveal such locations as "Ghosts of Lost Souls at Sea to be Shepherded Through the Watery Passageway," "Forgotten Sailors Sleep with Eyes Open Dreaming of a Salt Water Death" and "The Rich Man Finds No More Hope of Continued Life-Death Will Always Be A Stairway Behind".[5] Images of dragons—harbingers of good fortune in war—and tigers—devourers of evil spirits—could be found on the chart. The central ring depicted is an intrepid junk, surrounded by skulls, which is surrounded by the phases of the moon.[6]
Map as seen in On Stranger Tides.
- "Son, the Fountain. There be items required, for the Profane Ritual. Two Chalices."
"On the map, there was a Chalice—" - ―Edward Teague and Jack Sparrow
If lined up correctly, the map to the Fountain of Youth would be found, having the route through Whitecap Bay as well as a jungle-dense island which leads to the Fountain. The struggle for eternal life is symbolized by a tug of war between a skeleton and an angel, which is aligned with the the symbol of the Fountain itself: the Chalices.[7]
Indeed, this map was prized above all other charts, with the directions to many marvelous places. However, as many times as the Mao Kun Map has been used, the dates and distances can change and mislead the traveler who uses the map unwisely.[7]
Behind the scenes
- The Mao Kun Map was created by conceptual consultant James Ward Byrkit for At World's End. Bykrit also worked (uncredited) on making additions to the map for On Stranger Tides.
- The name "Mao Kun Map" came from On Stranger Tides: The Visual Guide.[7]
- In real-world history, the Mao Kun Map was a series of maps published in the late-Ming Dynasty military encyclopedia, WuBei Zhi. Believed to be based on the travels of Zheng He, they showed sailing directions between ports of Southeast Asia and the northern Indian Ocean, as far as Malindi.[8]

The notable changes on the map.
- Several mythological creatures were included on the chart, as well as a Hidden Mickey (lower right quarter) which looks similar to an early version of Mickey Mouse, and images of Elizabeth Swann and Jack Sparrow (lower left quarter).[5]
- In the revision screenplay draft of At World's End, when Hector Barbossa found that the Mao Kun Map was cut by Jack Sparrow, he was not going to say "Sparrow..." like in the finished version of the film.[9]
- There were at least three versions of the map. The first was seen several times in At World's End, the second wasn't seen until the last scene of At World's End (which had Florida, Cuba and the symbol of the Fountain of Youth added on it), and the third from On Stranger Tides (which was the second version but with an island added on it).[2]
- The map's paintings were used for the design of building that held The Legend of Captain Jack Sparrow attraction, particularly the Fountain of Youth portion of the map.
Appearances
- Pirates of the Caribbean: At World's End (First identified as the navigational charts)
- Pirates of the Caribbean: On Stranger Tides
- LEGO Pirates of the Caribbean: The Video Game (Non-canonical appearance)
- Kingdom Hearts III (Non-canonical appearance)
Sources
- Pirates of the Caribbean: The Complete Visual Guide
- Pirates of the Caribbean: On Stranger Tides: The Visual Guide (First identified as the Mao Kun Map)
External links
Notes and references
- ↑ Cite error: Invalid
<ref>tag; no text was provided for refs namedMotLotD - ↑ 2.0 2.1 2.2 2.3 POTC Interview with Jim Byrkit 2012
- ↑ 3.0 3.1 3.2 3.3 Pirates of the Caribbean: At World's End
- ↑ 4.0 4.1 Cite error: Invalid
<ref>tag; no text was provided for refs namedOST - ↑ 5.0 5.1 5.2 At World's End production notes: Chapter 15 - Props: Weapons, Maps, Rings or Whatever
- ↑ Pirates of the Caribbean: The Complete Visual Guide p86-87 "Sao Feng's Map"
- ↑ 7.0 7.1 7.2 Pirates of the Caribbean: On Stranger Tides: The Visual Guide, p26-27: "Mao Kun Map"
- ↑ http://commons.wikimedia.org/wiki/Category:Mao_Kun_map
- ↑ Worldplay: Calypso's Fury draft of Pirates of the Caribbean: At World's End script